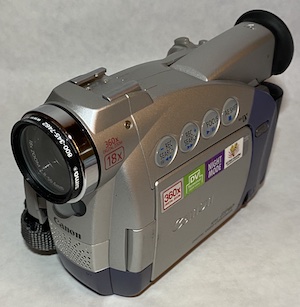
This is my trusty Cannon ZR40 camcorder. This particular camcorder uses MiniDV format tapes. During the 2000’s I recorded hours of footage onto these tapes that are hanging around my house.
I originally bought a camcorder with this format knowing that I would eventually want to transfer the video to future formats. At the time, I had the ability to transfer videos to a computer, but I didn’t have the storage to save much.
Now this camcorder is obsolete. I can record superior footage with the phone in my pocket. But I still want to preserve the video I previously recorded. Technology has improved to where I now have ample storage available. However, the digital interface is also obsolete, making it difficult to transfer data from the camcorder to a computer.
This blog post documents the hardware and software I used. Hopefully this will be helpful to someone trying to do similar video transfer. I will talk about both the hardware and software I used. The computer I was using happened to be an old Mac mini with a Thunderbolt 2 connection. That said, a slight modification should work on a Mac or Windows machine with a USB-C input.
Hardware
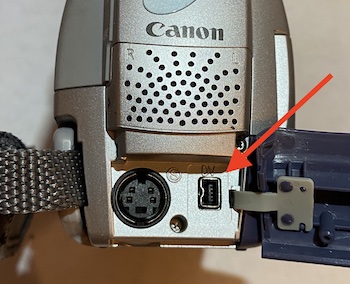
Before we can pull videos from the camcorder, we first have to connect the camcorder to the computer. To do this, the camcorder has this Firewire DV connector, which is common for digital camcorders of the time.
There are several videos available that describe how to make this connection (such as those from Howfinity, Scott Schramm, and Big Wheel Blading). They all follow the same basic approach described here, which is to chain a series of connectors that each link an older interface to a newer one. All of these connectors are available at the time of this writing.
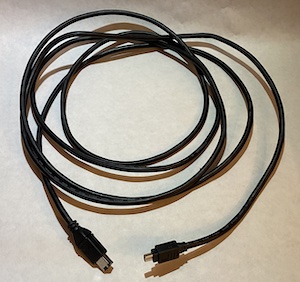
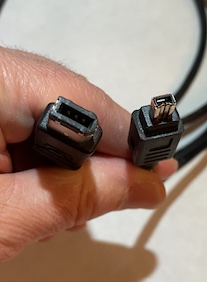
We start with a cable that connects from the Firewire DV connector in the camcorder to either a Firewire 400 or Firewire 800 connector.
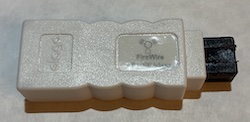
The next step will require a Firewire 800 connector. If you need to buy a cable, definitely get a DV-to-800 connector. I already had this DV-to-400 connector I used in the early days of the camcorder, so I needed this Firewire 400 to Firewire 800 adapter as well.
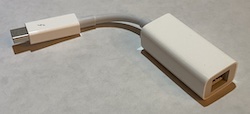
Next, you need another adapter to convert the Firewire 800 to Thunderbolt 2. I was fortunate enough to have a working computer old enough to have one of these ports in it.
If you have a newer computer, you likely have a USB-C port on it. If so, you can get one final adapter to convert the ThunderBolt 2 to USB-C.
Software
Getting the camcorder connected to the computer is half the battle. The second half is getting software capable of downloading the videos. Unlike the hardware, I did not find a lot of suggestions about software to use other than some rather expensive video editing packages.
Fortunately, the camera registers as a standard video input, so the video from the camera in playback mode can be streamed to the computer in the same way as a webcam. I’m cheap, so I eventually found a solution using freely available software. I did this in three steps: streaming in the video, re-encoding the data, and trimming the video.
Streaming: OBS
To pull the video from the camcorder, I used an application called OBS Studio. This is a video and audio mixing program for video recording and streaming. As mentioned before, the camcorder is registered by the computer as a video source (whether in record or playback mode), and OBS can import it and record it to a file.
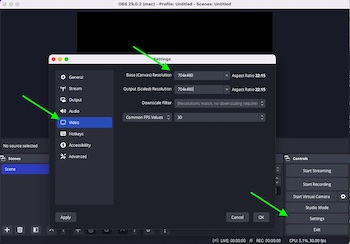
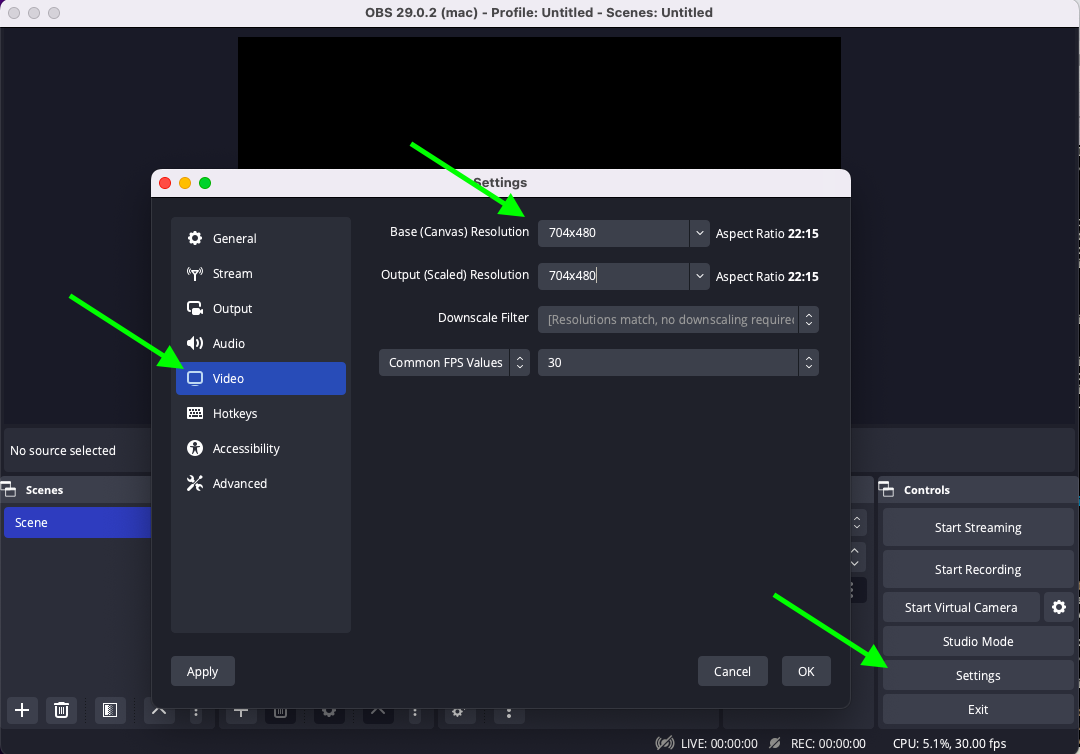
To set up OBS, the first thing to do is set the resolution of the video
being created. This should be set to the native resolution of the video
being imported. The resolution of MiniDV video is 704x480 (in products sold
in the U.S.).1 You can change the resolution of the canvas in
OBS in the Settings (under the Video section) by typing it in.
While in the settings, take note of (or change) the Recording Path in the
Output section`.
Next, click the + button at the bottom of the Sources box and add a
Video Capture Device. In the dialog box you should be able to select the
camcorder attached to the computer. Once created, the box for the camcorder
video should fit exactly in the canvas. (If not, resize the resolution
appropriately.)
When you play from the camcorder, you should see the video in OBS. Rewind
the tape, click Start Recording, and play the video from the camcorder.
Let the video play through and then hit Stop Recording. OBS will write
out a .mkv file of the captured video in the directory previously
mentioned in the settings.
Encoding: VLC
I find the .mkv file created by OBS problematic. First, I find that few
software tools can read it. Second, the encoding used has worse compression
than other modern encoders. Thus, the next step is to convert the file and
re-encode the video. VLC is an excellent tool to do this.
I have a love-hate relationship with VLC. On one hand, VLC supports an amazing list of supported file formats and encoders, and it is my go-to tool for playing and converting videos. It is a program that I rely on regularly, and I’m so grateful to have it for free.
On the other hand, I struggle a lot with with the interface. I find the user interface very awkward, and I struggle to do anything other than just play a video. I use it when I need to convert video formats, but I usually struggle with the dizzying amount of options. I did eventually wrangle VLC to generate movie files I was happy with.
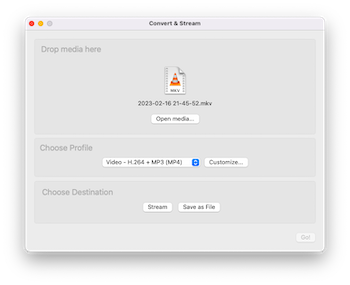
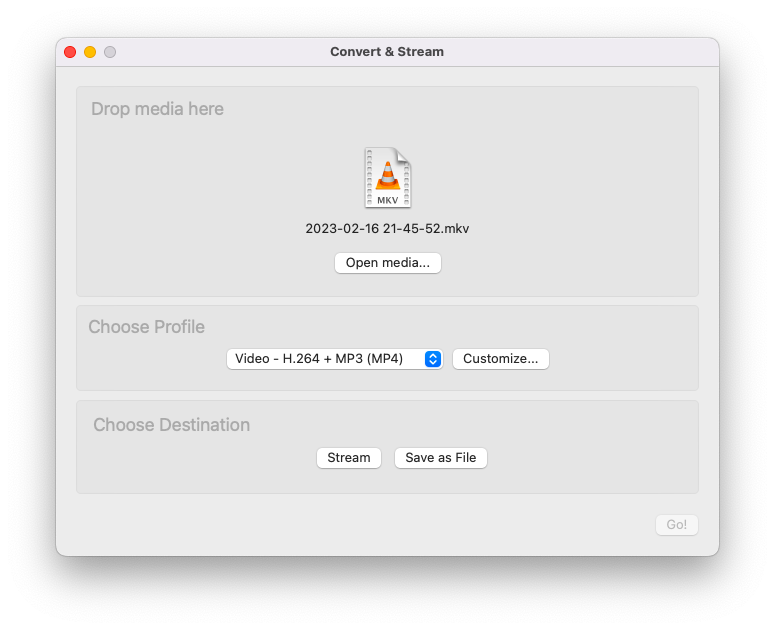
VLC has a particular function to convert a file from one format to another.
From the menu, select File → Convert / Stream.... The dialog box it
produces has 3 sections. The first and last are straightforward to select
the input and output, respectively. The middle section allows you to select
the encoding used for the output file.
The choice of video encoding is important. It determines the movie quality,
the file size, and what players will support it. The default profile,
H.264 + MP3 (MP4), hits many but not all of these goals. It compresses
video quite well while maintaining good video quality. It almost plays in
Quicktime (the most convenient player on my system), but the audio does not
come through, which is frustrating. Fortunately, this is easy to fix.
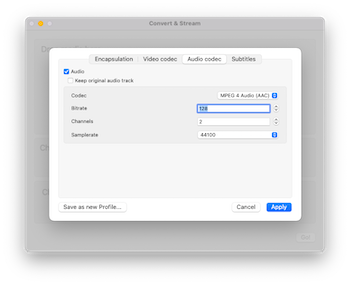
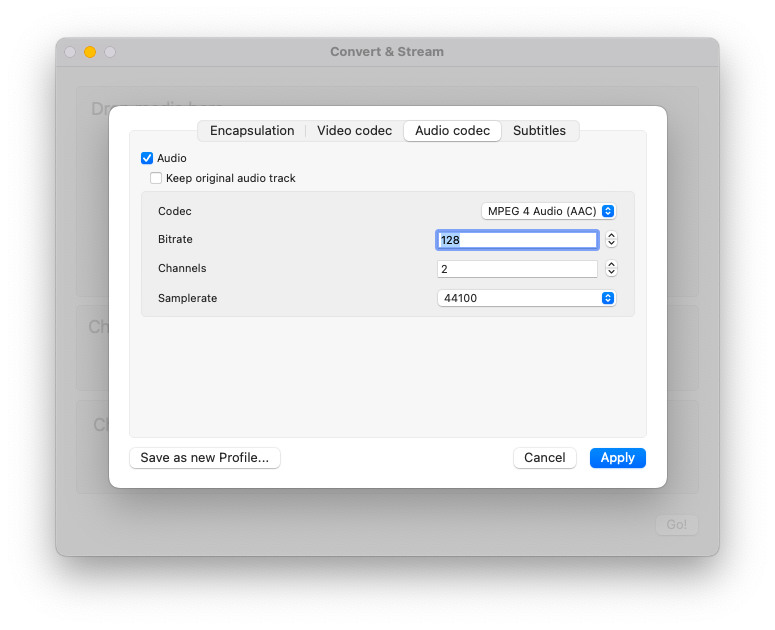
Select the H.264 + MP3 (MP4) option in the chooser box and click the
Customize... button. Most of the original options are fine. Go to the
Audio codec tab and change the Codec to MPEG 4 Audio (AAC). This
profile plays well in Quicktime and many other programs. It’s worth saving
this profile. Click on the Save as new Profile... and choose a name.
Once all the options are set, click Go!
Trimming: Quicktime
This last step is somewhat optional, but as I converted my old videos, I spent a lot of time trimming and splitting the videos. At the very least, each video is likely to have some garbage at the beginning and end of each recording as the tape started and stopped while OBS was recording. Additionally, I took the time to split the video into a separate file for each scene I filmed. It makes finding videos easier and I was able to leverage the filenames to record the timestamp (which was otherwise lost) and the content.
To do the trimming, I just used Quicktime. Simply load a video into
Quicktime and from the menu select Edit → Trim....
Conclusion
The clock might be ticking in being able to pull video off of this old camcorder. Assuming my camcorder doesn’t stop working (and that’s a big if), how much longer will these obsolete interfaces be supported?
To be honest, this video transfer was a time-consuming process. But forced myself to go through the trouble of transferring all this video before the interfaces become completely incompatible. Now, with careful backups, I should be able to carry these videos over into the future.
There is more to say about the resolution of MiniDV format, but it’s not particularly important for this discussion (hence the footnote). The native format is actually 720x480. However, 16 pixels per scanline are used for digital blanking, leaving a usable resolution of 704x480 for data. That said, in other parts of the world there are 576 scanlines, giving a resolution of 704x576. At any rate, when you import a video source into OBS, it can tell you what resolution that source is, so just use that. ↩︎