Not long ago I was part of a discussion about using mechanical things to demonstrate computing concepts (such as building a learning Tic-Tac-Toe game out of matchboxes). This got my head spinning on different ways to use mechanical devices to compute things, whether or not such computation is useful. I figured I had enough Legos lying around the house to make something interesting.
I started by thinking of some of the more famous early computers, such as Pascal’s calculator and Babbage’s difference engine. However, I chose not to implement these. Perhaps partially because they are mechanically complex, but also because they are missing some of the fundamental components we take for granted in computing. I wanted something that had a form of memory that could hold a state and then perform an action based on that state. I also wanted something that I could “program” by changing the state transition logic.
I ended up gravitating toward a clever toy called Digi-Comp I, which was manufactured in the 1960’s. The Digi-Comp I is a simple 3 bit machine that is programmed by adding or removing pegs in its side. As it happens, a company named Minds-On Toys recently started selling replica Digi-Comp I kits. A rational person would have just bought and assembled one. But not me.
I wanted to make my own device to prove to myself that I could. I borrowed a lot from the Digi-Comp design and ended up with something that worked fairly well. My computer only had two bits instead of three, and I didn’t have a nice clocking mechanism, but it was compact and operated quite nicely. Here is a video of it in operation.
After posting this video, I was inundated with requests for more details on the internal mechanisms. (Well, OK, I got a couple of comments.) Anyway, this post is me finally getting around to providing more detail. I have long ago dismantled the device, and I have no intention of providing step-by-step instructions in any case. However, I am giving the high level concepts that lead me to the final design. My implementation is far from perfect anyway, so there is lots of room for improvement.
Basic Design
There are two main components to the computer. The first is a memory structure that holds some number of bits (in my case, two) to represent the state of the machine. The second is a control circuit that takes as input the memory bits and produces as output the signals that change the state of the memory. Because there is this feedback loop between memory and control logic, you need a fairly careful timing mechanism so that the output of the control holds steady long enough to set the appropriate state of the memory. That said, this control mechanism is basically missing from my computer. Instead, it relies on the operator (me) performing several different motions in the correct order to advance to the next state (as you can see in the video with me flipping several controls).
Of these two components, the control mechanism is fairly straightforward. There are several ways to build logic gates out of mechanical components like Legos. One of the simplest to implement and most compact designs for gates uses rod logic. Memory, however, is generally more complicated than simple logic. It was the creation of this memory that dominates most of this computer’s design.
The Flip-Flop
Memory can be implemented using a special kind of digital circuit known as a flip-flop. The flip-flop is designed to change its state when it receives a signal and then continue to hold that state after the signal is released.
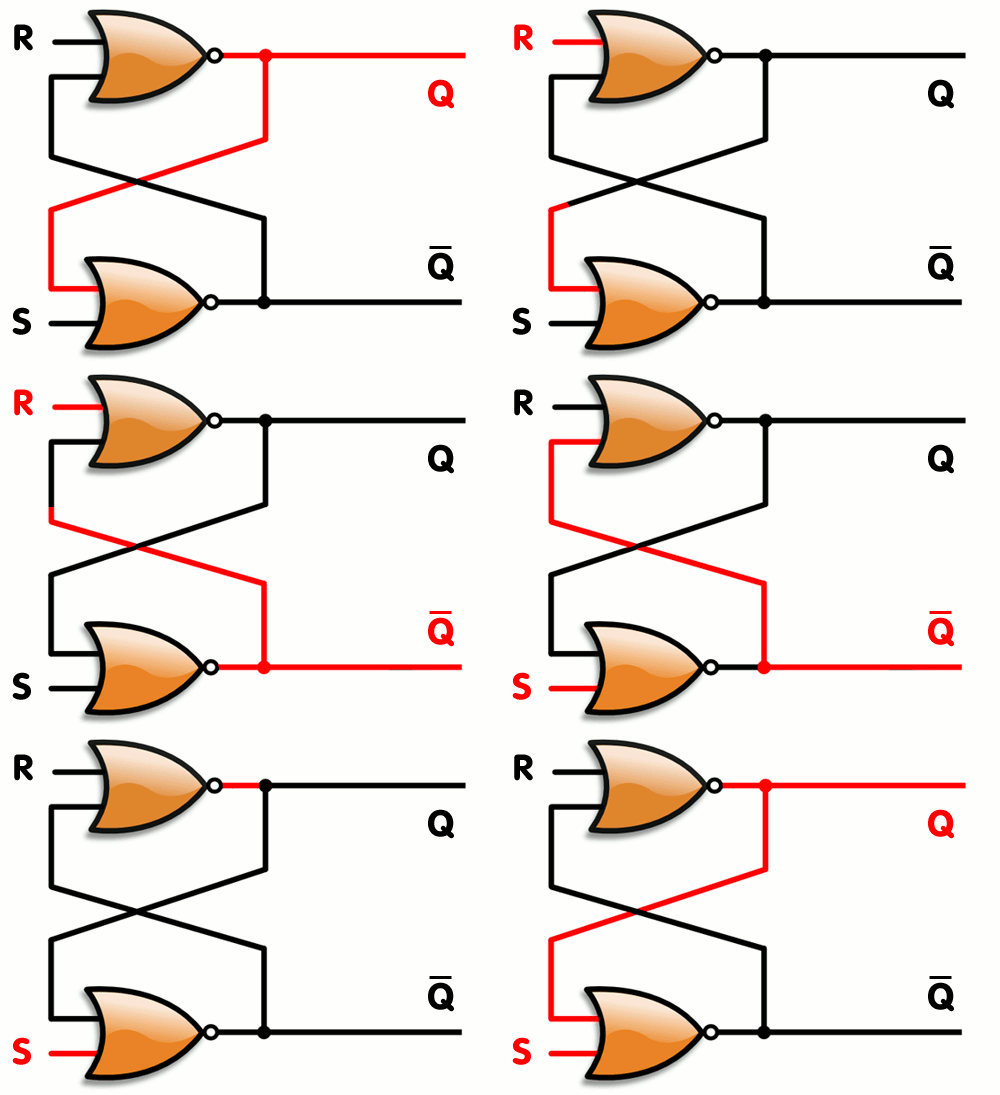
A flip-flop can be constructed out of standard gates (at least, the electronic variety) using a feedback loop that makes a circular loop from the output of gates back to the input of the same gate. If constructed carefully, this feedback can hold the output state of the gate. This image here shows an animation of a set/reset (SR) flip-flop. When the set (S) signal is raised, the output goes positive and stays that way even after S is lowered again. When the reset (R) is raised, the output goes negative and stays there.
This circuit is straightforward to build out of electronic logic circuits, but problematic when the gates are mechanical. The real challenge is in designing this feedback loop in a way that does not lock up the mechanism. Added to this challenge is the fact that the overall mechanical computer introduces a second feedback loop (memory to control back to memory) that must also be managed.
Fortunately, there is a simple way around all these problems. The approach bypasses all these problems by building the flip-flop without any gates at all. A simple device is shown below.
That’s right. The mechanical flip-flop is… a stick. I’ve added some labels to define the SR implementation and a post to clearly mark the position, but ultimately the flip-flop is just a stick you push back and forth. Unlike electrons, sticks (and really most physical things) tend to stay put, so you can represent state by where they are sitting.
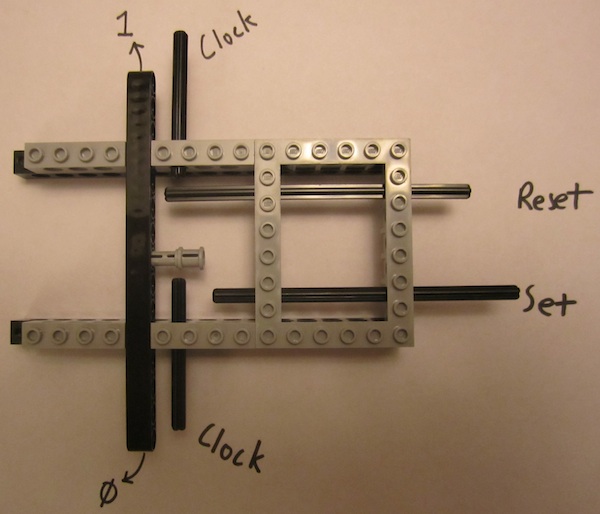
Of course, to use this stick flip-flop in a larger circuit we’ll need to place it in a holder. And to support the circuit from control back to flip-flop, we need a gating mechanism that hold the set or reset signal until the rest of the control logic gets out of the way (literally) and then activate it with a clock signal. Both of these are demonstrated below.
The set and reset signals are now bars that block a second pair of “clock” bars from moving the stick. As long as both set and reset are blocking, the flip-flop state will remain in place. Set or reset is activated by moving that bar out of the way, and the next time you push the clock the state of the flip-flop will change.
The actual flip-flops implemented in my Lego mechanical computer are a bit different. They are designed to activate the set or reset by pushing in rather than pulling out, but the basic idea is the same.
Control Circuit
Notice in the image above that this design for a mechanical flip flop places the set and reset bars perpendicular to the stick representing the flip flop state. As it happens, this is an ideal position for the set/reset signals to be in.
The mechanical computer has yet another bar for each set and reset that slides laterally in and out to activate the set or reset. Because of the orientation of the set and reset bars, it is simple to add posts to the flip flop state stick that will block the set or reset from being activated. These posts are moved in and out of the way based on the position of the stick (i.e. the state of the flip flop). The operation of this mechanism is clearly shown in the video.
Multiple flip flop sticks can be stacked to provide posts for each bit of state. Thus, the control for each set and reset is an AND operation for the state of each bit. For an arbitrary number of bits, this logic is not powerful enough to capture every possible state change, but for just two bits (the number in my computer), it just so happens to be enough to capture all possible state changes.
The nice thing about this control logic is that it is very compact giving the overall mechanical computer a surprisingly small form factor. Another convenient feature is that the computer can be reprogrammed with minimal reconstruction. It is just a matter of moving the posts in the flip flop sticks, which are accessible from the front of the device.
The Final Word
The point of this device, if there is one, is to separate out the concept and theory of computation from the digital electronic devices we most commonly associate with computing. There is nothing inherently electronic about computers. It just so happens that it is much easier to design computing devices using components driven from electricity. At least, that is the state of the known inventions so far.
Links
Here is a collection of links to other projects concerning famous mechanical computers or other Lego computer projects (most far more impressive than mine).
- Replicas of the Babbage Difference Engine
- The Digi-Comp I, available for sale
- Lego replicas of the Babbage Difference Engine and Antikythera Mechanism by Andrew Carol
- An entirely mechanical implementation of a Turing Machine at the Claude Bernard University (Lyon)
- A functional replica of the Digi-Comp I using Legos


