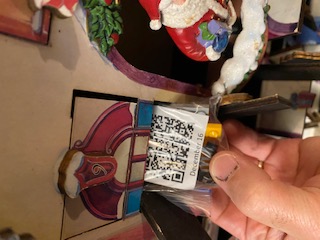
Years ago, we bought an advent calendar for our kids. It is a wooden structure comprising 24 hinged boxes. Some time in November, my wife would fill the boxes with little trinkets. Then, each day in December leading up to Christmas the kids could open a box and get a little surprise.
Years have passed, and the kids have outgrown the little stamps and stickers that typically populated the calendar. But the kids still love doing it. Which begs the question, what do we put in it.
So I had a thought. Rather than try to come up with 24 tiny presents, what if the items came together to form one large, and ultimately more fun, toy?
Doing that isn’t hard. A construction toy does just this. A construction set, such as LEGO, comes in little pieces that, in several steps, come together to build a single item. So just break up the steps into 24 parts, put the instruction parts with the associated pieces in each box, and let the fun ensue.
That’s probably enough instruction you need. That said, here is some added information that might be helpful.
Picking a Set
The first step, of course, is actually getting a construction toy. Just about any set will do. It just needs to have at least 24 steps to build something.
LEGO and other brands do sell pre-made advent calendar kits, and that is certainly the easiest way to go. However, all the kits I have seen are 24 tiny independent models, which is kind of missing the point of building something larger.
I try to go for something that is unlikely to be very recognizable until near the end. Also, our advent calendar has pretty small boxes, so I try to find a kit that looks like it comprises mostly small pieces.
I’m sure any brand of kit will do. I find the LEGO brand kits have a couple of useful features for the project, which I’ll mention later.
Dividing the Instructions
The next step is taking the instructions and splitting them into 24 parts. The easiest way to do that is to take the instruction booklet and divide the pages up somewhat evenly.
One particularly nice thing about LEGO sets is that LEGO provides online build instructions for any kit. You can download a PDF file for any instruction kit. Other brands might provide something similar. With the online PDF file, you can use an editor to split the pages into separate files.
With the instructions split up into 24 files, I post the files onto a cloud file service. Any file service will work as long as you can publicly share the files. There are plenty of free alternatives (such as Google Drive, OneDrive, Dropbox, and many others).

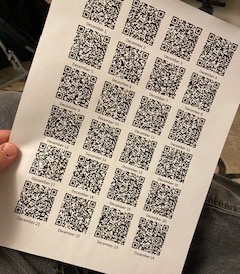
From there I use a QR code generator to convert the shared links to the files I posted to a QR code. (Once again, there are lots of free, online QR code generator services. I would pick one that allows you to copy/paste directly from the web page.) From there I open up a word processor and make a table of QR codes, labeled for each day.
Or alternately, you could just cut up the instruction booklet and just package up the pages directly.
Divvying up the Parts

Now that the instructions are split up, it’s time to fill up the advent calendar boxes. For each day, find the parts associated with those steps, and package them together with the QR code for the instructions (or the actual instruction pages if that’s the way you go).
This is the time consuming part. Here is another place where LEGO has some features to make it easier. First, modern LEGO instructions have, at the beginning of each step, a list of parts for that step. That makes it easier to correctly package the parts. Second, the moderately large LEGO sets divide the parts into packages that are opened sequentially. This makes it easier to find the parts for each step.

From there, place each bundle in the associated box of the advent calendar. Or, if you don’t have a calendar, put them in labeled boxes or bags or presents. It’s really all about a surprise each day.