Before I start, let me say that everything in this blog is stupid. You should not do the things I report on here. What I did will likely cause damage to property and possibly great harm to your person. That is, you might get hurt or die. You have been warned.
With that, let’s get to the fun.
This started with a project my wife started with the family. She brought several wooden snowflake cutouts to paint as a family project. The rest of the family is creative, but I couldn’t think of anything to put on it.
With no idea what to paint, I started looking around for things that could paint for me. I remembered that my kids had a spin art kit that made beutiful patterns with no effort.
I’m all about no effort. Except, alas, the spin art kit was long gone.
Well, that’s just quitter talk. Just because you don’t have a spin art kit doesn’t mean you can’t do spin art.
Chuck it Up to Bad Planning
All a spin art contraption does is spin something around fast. I have lots of tools that spin things around really fast. I have several tools with moters that spin things around quickly. I just need to find a way to stick a piece of wood in them. The easiest tool to do this is a simple drill. The drill has a chuck that is designed to hold things and spin them around fast.
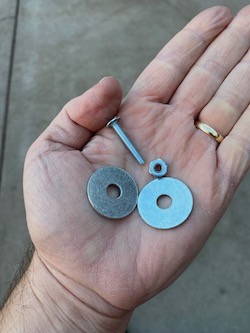
Great. Now I just nead to find something to put in the chuck. This is actually pretty easy. The chuck is designed to hold any slender cylinder. It turns out such cylinders are abundant: screws and bolts.
So, chucking up the “canvas” is easy. First, find the center (it doesn’t have to be perfect). Second, drill a hole (using that drill that we have). Third, stick the bolt through the hold and fasten using a couple washers and a nut.


Now that I have a makeshift axel, I can chuck it up on the drill.
Hmmm. This is not looking super safe, but I’m going to keep going.
Let’s Go
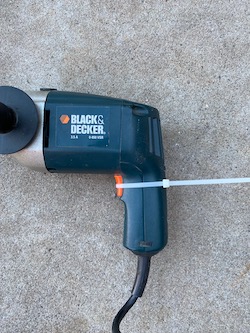
Now my canvas is ready to spin. I don’t want to hold this in my hand while it spins. So, to make it spin on its own, a simple cable tie can hold the trigger down.
An important thing to consider is that the drill I am using has a cord. Tying down the trigger on a battery powered drill would be problematic as you couldn’t control when it turns on and off. But with a corded drill I can plug and unplug the drill to turn it on and off. No problem.
Props
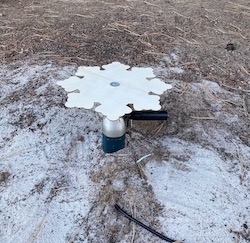
I still need to place this assembly upright. The easiest place I found to do so: a sandbox in my backyard. I just buried the tail end of the drill a bit in the sand.
Right now you may be thinking that this could ruin a drill. Couldn’t sand get stuck in there?
Yes. Sand can get in there. And it does. I warned you at the beginning that this is a bad idea.
Painting
Everything is in place. I just needed to put on some yardwork pants that I didn’t mind getting splashed with paint, plugging everything in, and letting it go.
<div style="position: relative; padding-bottom: 56.25%; height: 0; overflow: hidden;">
  <iframe allow="accelerometer; autoplay; clipboard-write; encrypted-media; gyroscope; picture-in-picture; web-share" allowfullscreen="allowfullscreen" loading="eager" referrerpolicy="strict-origin-when-cross-origin" src="https://www.youtube.com/embed/ptW9rdZqgwc?autoplay=0&controls=1&end=0&loop=0&mute=0&start=0" style="position: absolute; top: 0; left: 0; width: 100%; height: 100%; border:0;" title="YouTube video"
  ></iframe>
</div>
Art
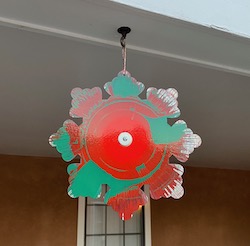
And so now I have this beutiful piece of art. I would say it was low effort, but I did spent an inordinate amount of time setting everything up. And getting sand out of my drill.

While I was painting the epic way, the rest of the family painted with more traditional methods. What was the best approach? I’ll let you decide.